Posted by Dan Peskin
This post was originally in YouMoz, and was promoted to the main blog because it provides great value and interest to our community. The author's views are entirely his or her own and may not reflect the views of SEOmoz, Inc.
Analyzing keyword performance, discovering new keyword opportunities, and determining which keywords to focus efforts on can be painstaking when you have thousands of keywords to review. With keyword metrics coming from all over the place (Analytics, Adwords, Webmaster Tools, etc.), it’s challenging to analyze all the data in one place regularly without having to do a decent amount of manual data manipulation. In addition, dependent on your site’s business model, tying revenue metrics to keyword data is a whole other battle.
This post will walk you through a solution to these keyword analysis issues and provide some tips on how you can slice and dice your data in wonderful ways.
With Microsoft Excel, we can create a report with all the keyword data you will need, all in one place, and fairly easy to update on a weekly or monthly basis. Then with all this data we can easily categorize segments of it to more quickly determine the better performing sets of keywords.
What we will need to do is push Google Analytics, Webmaster Tools, Adwords, Ranking data, and Revenue data all into one excel spreadsheet. Then we will put it all together into one master report and one categorized pivot table report.
To start, you should be especially familiar with pivot tables, the Google Adwords API, the Google Analytics API, and keyword research of course. Utilizing these APIs and being consistent in the formatting of the data you put into your spreadsheet will make it easy to update. If you aren’t familiar with these tools, I have provided resources below and some steps to organizing this data.
Here are some resources for learning to use pivot tables in Excel:
Excel for SEO
Microsoft Pivot Table Overview
Now let’s go fetch that data.
I Got 99 Problems, But A Keyword Visit Ain't One
First off we need to get our keyword traffic metrics through the Google Analytics API. I suggest using Mikael Thuneberg’s GA Data Fetch spreadsheet. You can follow the instructions, read the how to guide, and download the file here.
Make sure to build off the GA data fetch file or a copy of it, as it has the proper VBA functions (the Visual Basic code that allows for the API to work) installed for API calls. Once you have your API token and the spreadsheet setup you can perform your first API call.
We will be using the more complex query to extract organic keyword visits for a specific date field and filter by the number of visits. The query I use for example, will output visits, average time on site, page views, and bounces for any keyword with 5 or more visits in the last 30 days. However, you can modify the parameters to your liking. To see what other metrics can be used, check out the Analytics API documentation.
Your Analytics data should look something like this:
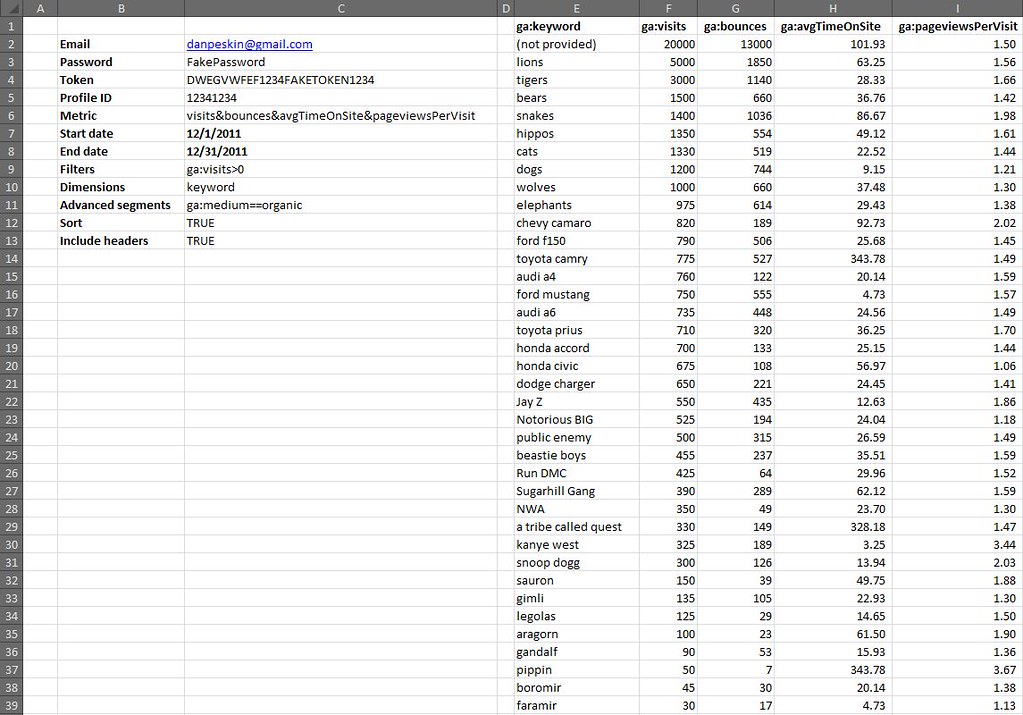
Google Analytics data called through the API in Excel.
Now select the whole keyword column and create a pivot table of the keyword list in another sheet. In the adjacent column create a table where the cells equal the values in the pivot table column. Label this table “KeywordList” or whatever you like. We now have the keyword table to reference for extracting Adwords data.
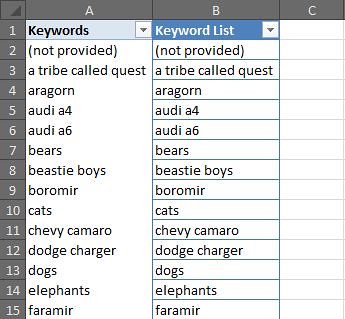
Pivot tables don’t have the same referencing abilities as regular tables, so the table in column B is what you will reference in future steps.
To Be, Or Not To Be Searched, That Is The Question
Next up is pulling in search volumes for our keyword table. Thanks to the wonderful Richard Baxter, there are a couple articles on using and installing the Adwords API Plugin. One on SEOmoz and one on Seogadget.
I know the Adwords API access is a bit of an issue for some, so if you cannot use the API, utilize the Google Adwords Keyword Tool (gathering data from this tool will unfortunately require a lot more work).
In a new sheet, use the Adwords API array formula called “arrayGetAdWordsStats” to pull in the average and seasonal monthly search volumes for your keyword table. Your formula should look something like this:
=arrayGetAdWordsStats(KeywordList,”EXACT”,”US”,”WEB”)
You should now have 12 months of historical search volumes and averages for all your keywords.
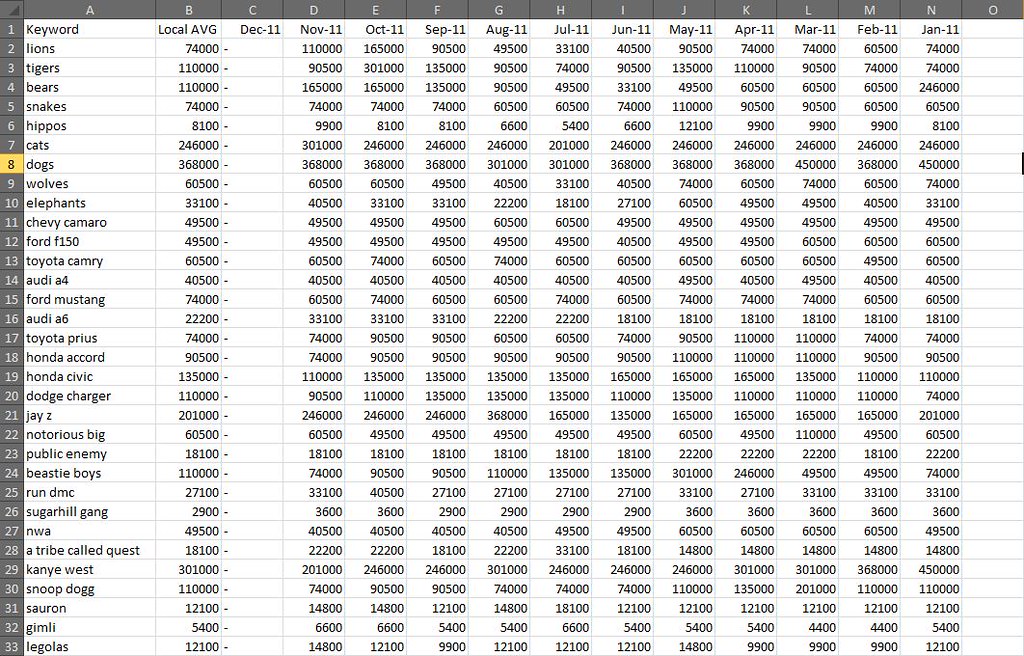
Results from an Adwords API call usually look like this.
Note: If your keyword list is greater than 800 keywords, you will have to break out the list into a few separate tables just to perform API calls for those keywords. If this is the case, make sure to keep each array of search volumes aligned in the same columns.
The Impression That I Get
No API required here, Google’s Webmaster Tools provides a pretty easy way to download its search query data. If you open up the Search Queries report in Webmaster Tools there is an option to “download the table” at the bottom. Download the table for the same date range you used earlier and drop it into a new sheet.
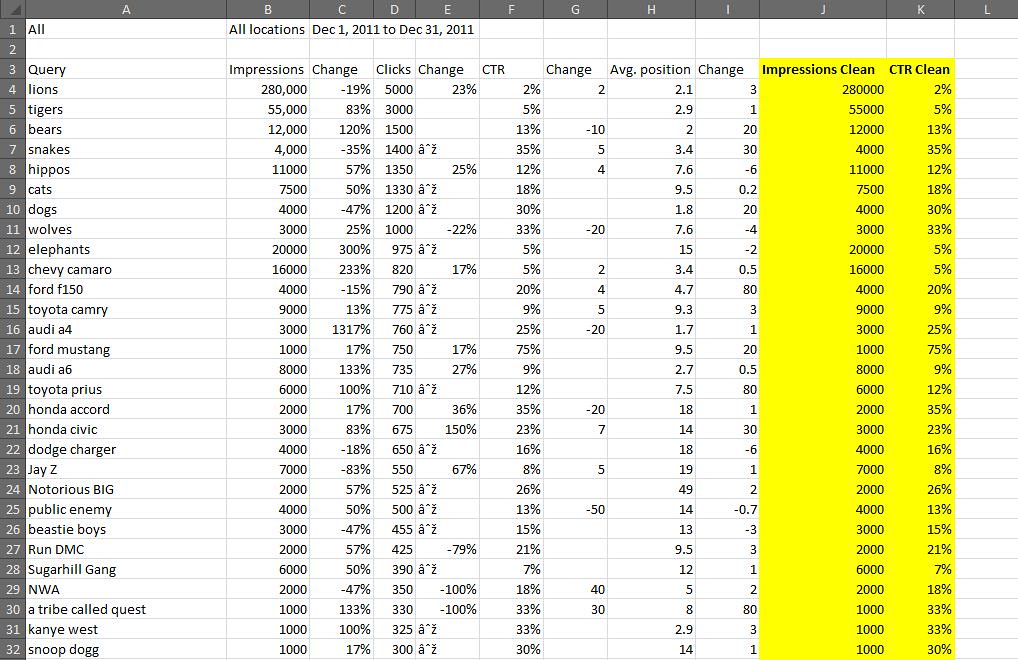
The report downloaded from Webmaster Tools. Note the “-“ is used for zero values, in the yellow columns I simply cleaned that up with an IF statement.
Impressions, CTR, and Average Rank can now been added to our metrics.
If You Ain't First Page, You're Last
Since we all know how accurate average rank is from Webmaster Tools, let’s get some current rankings into this report .Grab your main keyword list from the spreadsheet and run rankings for them with your application of choice. I usually use Rank Tracker, but I am sure everyone has their own preference. Once you have your rankings drop it into a new sheet.
The More You Know
The number of metrics we can add to the report are limitless, but there comes a point where adding too many can create more work for updating the report or create analysis paralysis. The only other metric I suggest adding in is the SEOmoz Keyword Difficulty if you have a PRO account. Again this may be very time consuming to add for large numbers of keywords, hopefully you have an intern for that.
Mo Money Mo Metrics
Revenue data may come from different places dependent on how your business works, so I unfortunately don’t have a one stop solution to importing that data. However, most applications usually allow you to download that data to CSV or Excel. If you have Ecommerce enabled in Google Analytics, you can use the API to pull in this data. As long as you have some metrics to relate to your keyword such as Average Order Value or Conversion Rate, drop it in a new sheet and you will be good to go.
Some of you may be asking yourself what to do if your revenue data does not tie back to the keyword visit. This is where the categorization of keywords plays an extremely important part in this report. In this case, we want to create a bridge between the revenue data and keyword data. This can be done through categorizing your keywords into a category that relates back to a field in your revenue data. For example, you might be able to associate keywords with product names or landing pages. These products or landing pages would then become categories. Once you have determined what your categories will be, you can assign them to keywords in a new sheet that simply contains keywords in one column and the category tag in the other. You can learn more about keyword categorization here.
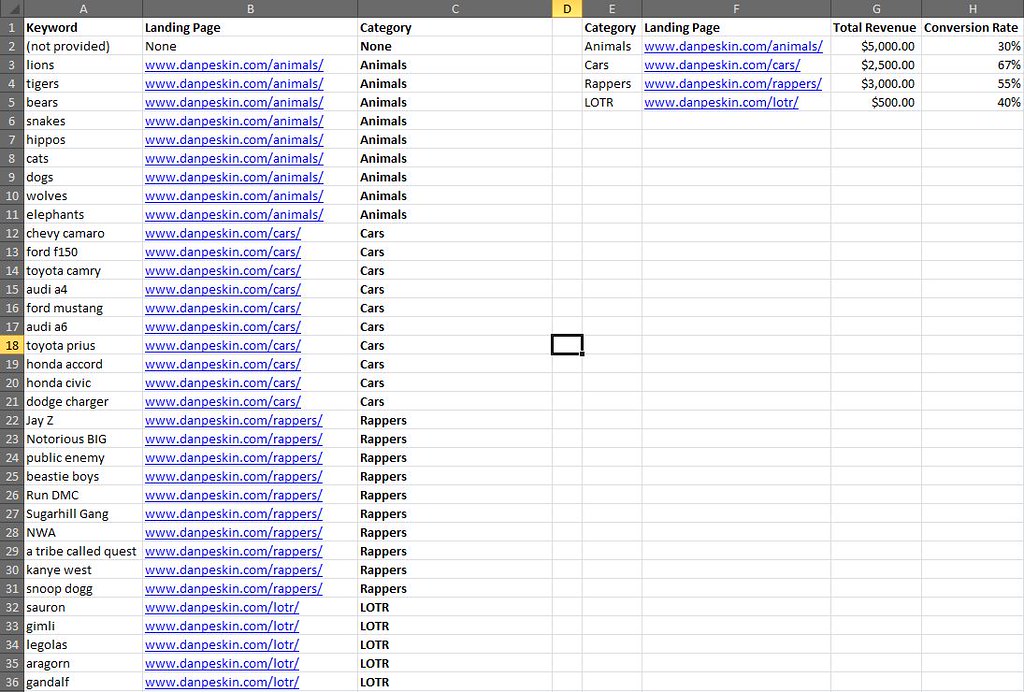
Categorizing the keywords above not only lets me group them to aggregate metrics for analysis, but it allows me to bridge the gap somewhat between the keywords and conversions in this example.
One Report To Rule Them All
Finally we have all the data; we just have to put it all together. Create a new sheet and pull in your master keyword list by using =NameOfTheTable, drag this down until you reach the last keyword on the list (paste values after if you want sorting capabilities). Now select your keywords and create a new table. In the columns next to the keywords all you have to do is a VLOOKUP of each metric you would like to add to your report. Once you fill in the first cell of each column, the column should automatically be added to the table and populate the other cells with the equation. Repeat this process until all your metrics are in this table.
There will also be a need to calculate some metrics such as the Bounce Rate or Conversion Rate if you pulled in revenue data. Those should be added in adjacent columns as well. Additionally, if you didn’t need to categorize your keywords earlier, I suggest categorizing them now in an adjacent column. When completed your master report should look something like this:
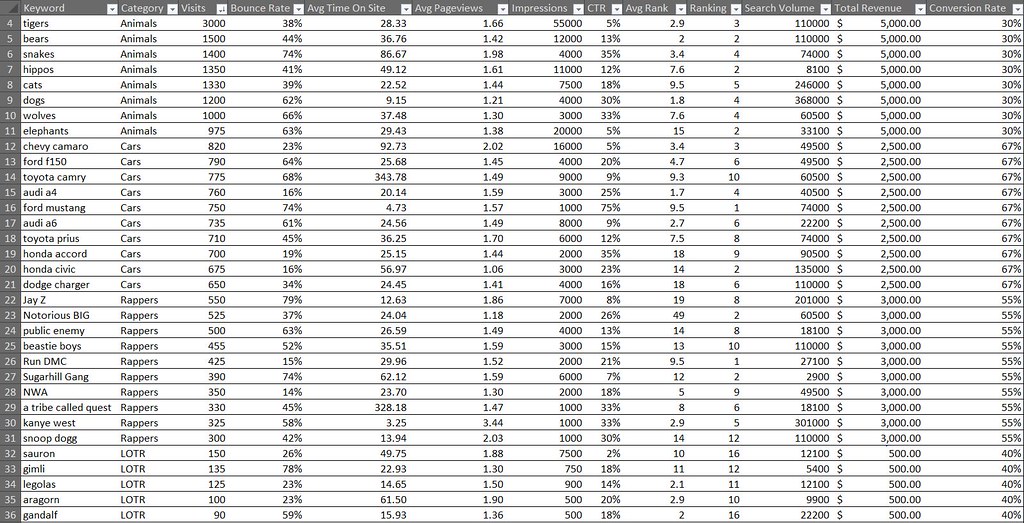
The master report.
Amazing. We have all the data in one place in a simple to sort and use table! Just wait…it gets better.
Pivotal Success
Now you may be wondering how this report can get any better. Two words my friends: Pivot Tables.
Creating a pivot table of your master report will allow you to segment your data in a number of ways that weren’t possible before. In the Pivot Table Field List, the Row Labels, Column Labels, and Values will define the layout of your report. What we first need to do is drag and drop the Category and Keyword fields into the Row Labels respectively. This will set your top level metrics to summarize at the Category level and allow you to drill down into each Category to see the associated keywords and their individual metrics.
Next you will want to start dragging your metrics into the Values section, which will automatically populate the Column Labels section with the Values field. As you add your metrics in, you can edit their names and the way they are aggregated. You will want to think carefully about how you will aggregate certain metrics so that viewing those summarized numbers at a Category level makes sense.
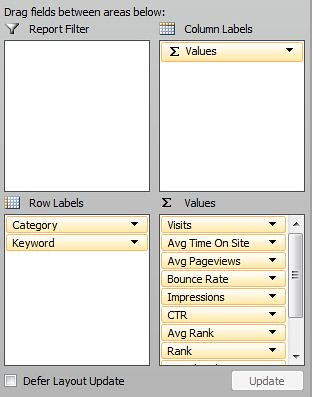
This shows you how best to setup your pivot table fields and their value settings.
For instance, I might summarize Impressions and Visits, but average CTR and Bounce Rate. Seeing the average CTR and Bounce Rate for a Category will allow me to narrow down which sets of keywords are performing better than others. Then looking at the total Impressions and Visits for those well performing categories will allow me to see where there might be a higher potential to increase traffic to my site. While this may not be an absolute rule to determine keyword focus, it is a good rule of thumb and can be a way to prioritize which ones to focus on.
Pivot table reports also allow you to add report filters, letting you filter out data by any metric or even multiple metrics. With this you could analyze keywords that only rank on the first page of SERPs using the current ranking as a filter. Hell, you could add a field to the master report calculating the number of words in each keyword phrase, then filter by that and bounce rate, giving you your well performing long tail keywords. Get creative, let loose, play with the metrics, you will be surprised at what kind of conclusions you can make about your site’s keyword traffic.

The final product.
Conclusion
Updating the report is simple. Rerun the API calls with the new date range, rerun your rankings for the new keyword list, and export the other reports you need with new date range. As long as you kept your formatting and equations the same, the rankings and other reports should be dropped into their respective sheets without having to change anything. The master report should automatically be updated once you update the keyword column and the pivot report should update once you hit refresh under the pivot table menu. That’s it!
Well I should probably stop talking now and let you get to your hours upon hours of keyword analysis fun. Hopefully this was informative enough to make building a report such as this fairly easy. I would love to hear your feedback and will gladly answer any questions or comments about the post below. If you have issues later on, you can always contact me via Twitter.
Sign up for The Moz Top 10, a semimonthly mailer updating you on the top ten hottest pieces of SEO news, tips, and rad links uncovered by the Moz team. Think of it as your exclusive digest of stuff you don't have time to hunt down but want to read!

 Twitter said that it must begin censoring tweets, if the company was going to continue to continue its international expansion. Twitter has been blocked by a number of governments, including China and the former Egyptian regime after it was used to ignite anti-government protests.


